

Which workspaces have a Modeler
A workspace has a Modeler when its data lives in a warehouse. The workspace Origin, picked in Create Workspace, sets what the Modeler shows.
To create the workspace, see Set up your organization.
Before you start
- A workspace with one of the origins above
- The Admin or Owner role in the organization. Viewer and Member can open the Modeler but can’t change it.
- Your warehouse set up for Kubit, with the identity and grants from its page: Snowflake, BigQuery, Databricks or ClickHouse
- The table that holds your events or spans, with one row per event and a timestamp column
How a model fits together
A Kubit model is a set of mapped warehouse tables. The Schema tab lists them. Each part has one job: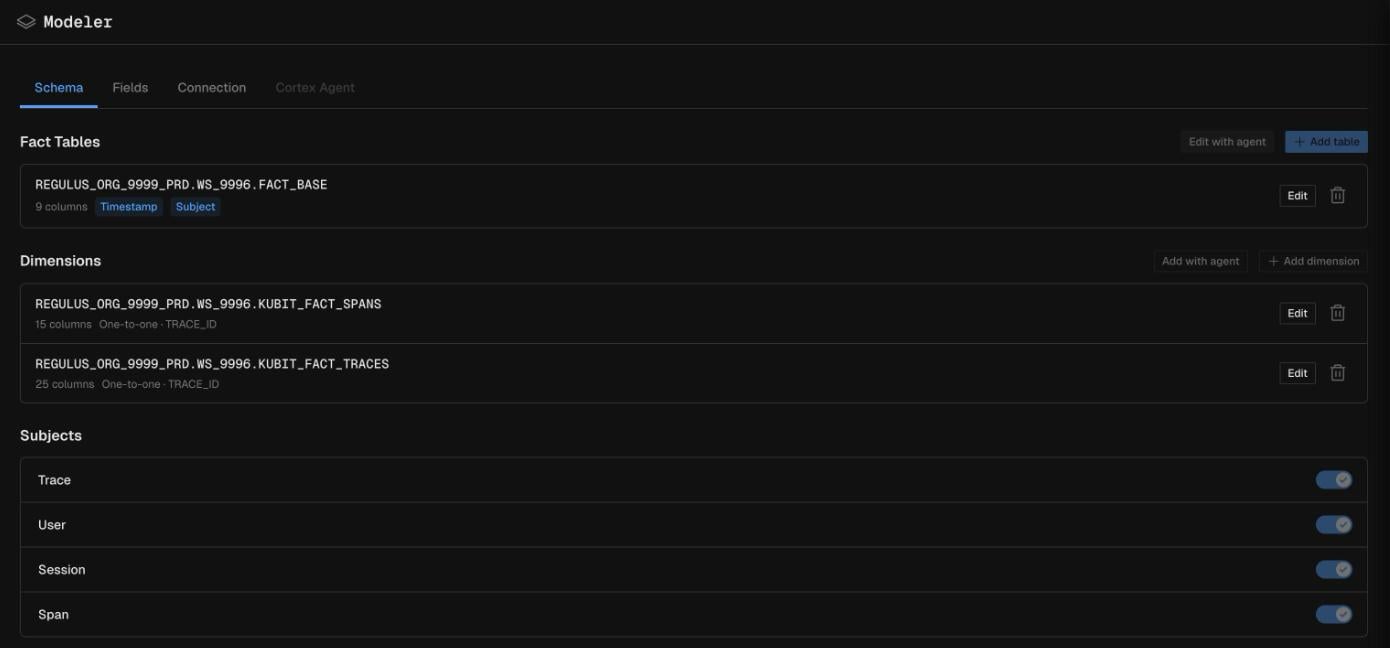
Map your data with the Modeler agent
The Modeler agent is a chat panel inside the Modeler. You can map a table you picked, or ask the agent to find the best fact table in your warehouse.1
Connect your warehouse
On the Warehouse Connection screen, pick New connection, set Warehouse type and fill in the fields from your warehouse’s setup page. Click Test connection, then Connect warehouse.To reuse a connection from another workspace, pick Use existing, choose the Source workspace and click Copy connection & schema. That copies the source workspace’s whole model and activates this workspace, so you can skip the rest of these steps.
2
Start the agent
On the Schema tab, under Fact Tables, click Set up with agent. A draft opens with the Set this up with the agent card.
3
Pick a table or let the agent find one
Choose your fact table in the warehouse browser and click Map with agent. If you don’t know which table to use, click Find a table for me. The agent then looks through your warehouse for the best fit.The agent maps names, roles, derived columns and trace roles. Its proposal appears in the draft editor next to the chat.
4
Ask for changes
Type follow-ups in the Modeler agent panel (Ask the agent about this mapping). You can also edit any row of the draft yourself.
5
Apply the draft
Click Apply. The first apply asks you to confirm:Click Apply and continue instead to apply and open a new draft right away.
6
Add dimensions
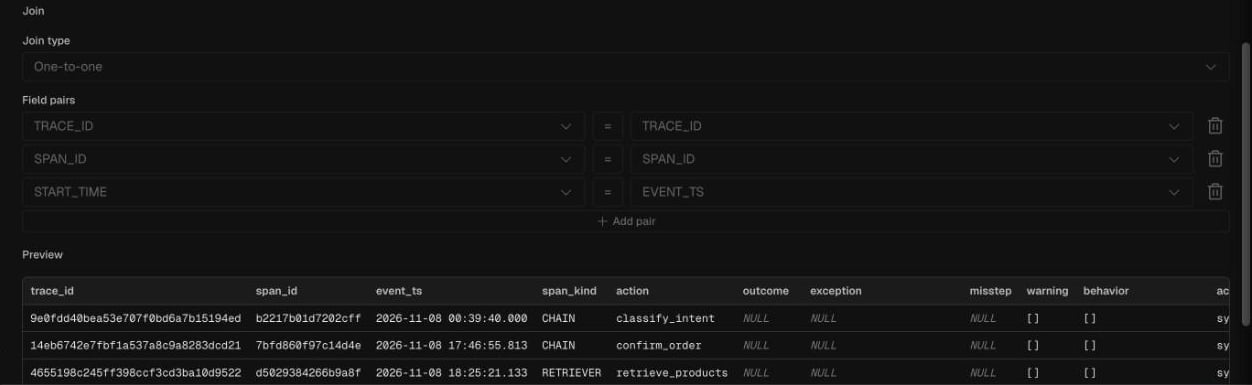
Under Dimensions, click Add with agent and pick the table. The agent maps it and proposes its join to the fact table. Review the join, then apply.
Prompts for the Modeler agent
Type these in the Modeler agent panel. They’re written the way you’d ask a person.“Map theeventstable as the fact table. Useevent_nameas the event,received_atas the timestamp anduser_idas the subject.”
“Add user_plans as a dimension joined on user ID, and keep the plan each user had at the time of the event.”
“Mapspansas the fact table and set up trace roles fromspan_id,parent_span_idandtrace_id.”
What the agent can change
The Modeler agent edits a draft, never the live model. Nothing changes until you click Apply.
Raw SQL in a mapping needs a custom connection, one you set up with your own warehouse credentials.
The Kubit MCP server and the Claude Code plugin read the model, but they can’t create or edit it. Use the Modeler agent for that.
Map a table by hand
The same mapping works without the agent, from the Schema tab.- Under Fact Tables, click Add table. The Add fact table drawer opens.
- In Browse warehouse, pick the table. Tables already in the model are marked Already mapped.
- Under Columns, set a Field mapping for each column you want. Give one column the Event role, one Timestamp and at least one Subject.
- Optionally add a Row filter, and check Preview.
- Click Save.
Drafts and versions
A draft is a private copy of the model where you or the agent make changes. Only the person who started it can see it.
A draft can’t be applied once the live model changes after it was started. Kubit shows
An unfinished draft was started before this model last changed. It can no longer be applied. Click Discard draft and start again.
Agent Observability presets
A preset maps a known trace format for you. The MLflow Tracing, Cortex Agents, Google ADK and Langfuse origins each open on their preset tab.- Connect the warehouse the preset needs (see the origin table above).
- On the preset tab, click Set up MLflow, Set up Cortex Agent or Set up Google ADK, and choose the trace table. A Langfuse workspace opens on its Langfuse tab.
- Review the Tables to create, then apply.
Verify
A workspace activates once it has all three of these:- A warehouse connection
- A fact table with an Event and a Timestamp column
- At least one enabled subject
No data yet. Finish setting up your model. with a Set up model button.
To check the model, open a Query report and look for your events and fields in the pickers.
Limits
If it fails
Next steps
- Bring your own warehouse: how Kubit connects to your warehouse, and links to each setup page.
- Reports overview: the report types that read your model.
- Concepts: traces, spans, sessions and execution paths in Agent Observability.